Cardboard Tube Thankful Turkey
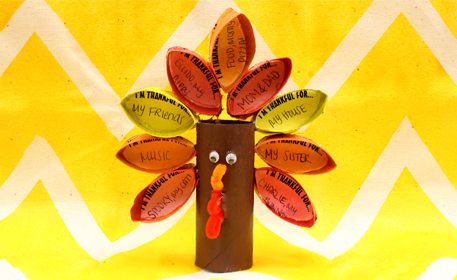
Use recycled cardboard tubes to create a Thankful Turkey and share what you’re grateful for this Thanksgiving season!
printDownload TemplateMaterials
Round Paint Brushes
Rainbow Fuzzy Sticks
Acrylic Paint
Wiggly Eyes
1 Cardboard Tube
1 Small Cardboard Tube
Scissors
Card Stock
Pen/Pencil
Craft Glue
Hot Glue (Optional) *Adult Supervision Required
Instructions
Step 1.
Gather your supplies.

Step 1.
Gather your supplies.
Step 2.
Download and print the provided template. To download the template, click the “Template” button above. These will be used as inserts for the turkey’s feathers. Use red, orange and yellow paint pens to color in your feathers and fill in what you’re thankful for!

Step 2.
Download and print the provided template. To download the template, click the “Template” button above. These will be used as inserts for the turkey’s feathers. Use red, orange and yellow paint pens to color in your feathers and fill in what you’re thankful for!
Step 3.
Flatten your large cardboard tube and cut 1” rings. We cut out 12 rings, but used only 9 for our turkey.

Step 3.
Flatten your large cardboard tube and cut 1” rings. We cut out 12 rings, but used only 9 for our turkey.
Step 4.
Paint your rings red, orange and yellow acrylic paint to match your feather inserts. Paint the small cardboard tube brown. This will be the turkey’s body.

Step 4.
Paint your rings red, orange and yellow acrylic paint to match your feather inserts. Paint the small cardboard tube brown. This will be the turkey’s body.
Step 5.
Cut a 1” piece of orange fuzzy stick and a 2” piece of red fuzzy stick for the turkey’s nose and wattle. Add two wiggly eyes so your turkey can see!

Step 5.
Cut a 1” piece of orange fuzzy stick and a 2” piece of red fuzzy stick for the turkey’s nose and wattle. Add two wiggly eyes so your turkey can see!
Step 6.
Once your paint has dried, cut out your feather inserts and glue them to the bottom of the rings, as shown. Shape your rings to the shape of the inserts by flatten the rings.

Step 6.
Once your paint has dried, cut out your feather inserts and glue them to the bottom of the rings, as shown. Shape your rings to the shape of the inserts by flatten the rings.
Step 7.
Glue the feather rings to your turkey using a hot glue gun.

Step 7.
Glue the feather rings to your turkey using a hot glue gun.